Tips & Tricks
How to Mix Real Characters Into 2D Animation With Cartoon Animator and After Effects
Tuts+PhotographyCombining real-world video with 2D animations and cartoon backgrounds is a blending of styles that can make your project stand out. With the help of Cartoon Animator, importing your video into 2D animated backgrounds couldn't be easier!
Cartoon Animator provides a simple way of exporting your 2D background footage with an alpha channel. This gives your exported video transparency, which you can then use with layered elements on top of each other to create your video. In this tutorial you'll learn how to combine live and animated alpha channel video using Adobe After Effects.
What You'll Learn in This Compositing Tutorial
In this tutorial we will show you step-by-step how to merge a live action character into a 2D cartoon background created using Cartoon Animator. It's almost Hallowe'en, so we're making a fun and spooky monsters' graveyard themed example.
Topics we cover will include:
- How to export a 2D cartoon background with an alpha channel
- How to import the video files and combine the different styles in Adobe After Effects
- How to use adjustment layers to blend the live action footage with the 2D cartoon background
- How to create a 2D scene with 3D depth in Cartoon Animator to create 3D parallax effects
What You'll Need
To follow along with this tutorial you will need your own version of Adobe After Effects and Cartoon Animator. You can download a free trial version for Cartoon Animator on the Reallusion Website.
You will also need a live action video, such as the ones linked below from Envato Elements. The person or object in the video needs to have have an alpha channel, or transparent background, which is usually filmed on green screen to make compositing easier. The 2D cartoon background can be purchased from Reallusion's content store for use in Cartoon Animator.
Follow Along With Our Stock Assets
Or you can click on the links below to download the sames file we've used in this tutorial:
- Halloween Background - this package includes a few different backgrounds to create a longer animation
- Man Running, Alpha Channel
- Wendigo monster walking with alpha channel
- Halloween Curtain
- Fog
A Note About DIY Greenscreen Video
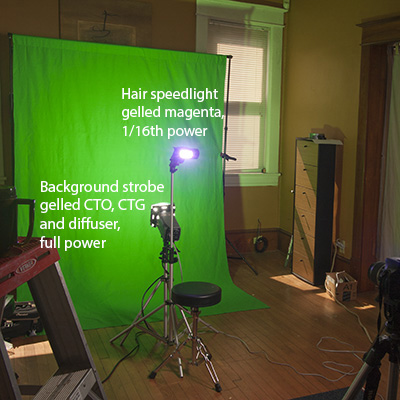
Making alpha channel video is a bit tricky, requiring a special backdrop, lighting setup, and shot preparations. The footage will also need some finessing to remove the figure from the chroma-key background before you combine it with the animation. That said, here are a couple of helpful tutorials to help build up your green-screening skills if you want to go the DIY route.
- ShootingCreating Realistic Composites, Part 1: Shooting on a Green ScreenRob Taylor

 Adobe After EffectsAccurate Green Screen Shadows and Camera MovesMatthew Perks
1. How to Create a 2D Scene with 3D Depth
Step 1
Open up your 2D background scene in Cartoon Animator. To do this go to your Scene Manager and navigate through the different scenes available. For this tutorial, we'll be using the Halloween themed scene! Double-click on the scene to open it up.


Step 2
You can also import your own custom scene if it has been created using layers in Adobe Photoshop. Simply click and drag your PSD file into Cartoon Animator and choose Scene.


Step 3
Opening up your scene will show you the default camera view.


Step 4
In order to view the 3D view, click on the 3D View button on the top menu bar. To navigate within the 3D view use the following:
- Camera Rotate: Click-and-Hold the Right Mouse Button
- Camera Pan: Click-and-Hold the Left Mouse Button


Step 5
To move and edit the scene, simply click on one of the layers and a coloured widget will appear. From there you can choose one of the coloured arrows to move the layer in any of the directions that you choose.
Step 6
Once you are happy with the arrangement of your 3D scene, click on the 3D View button on the top menu bar again to return to the default camera view.
Here you can test out the 3D parallax effect by holding the ALT key on the keyboard and clicking and dragging the Left Mouse Button to move the camera around. You can also use the mouse wheel to zoom in and out to check how the scene will animate with different camera animations.
2. How to Animate the 2D Background Movie in Cartoon Animator
For this example we've simply added a camera zoom animation, which is done by using the following steps. Our final animation is a live-action person running away from a horde of animated monsters, so to emphasize that action we'll first prepare the background to give a little bit of motion to the shot.
Step 1
Click on the Camera Record Mode button at the top of the screen.


Step 2
Open the timeline at the bottom of the screen by pressing the Show Timeline (F3) button.


Step 3
Select the Camera from the timeline options to open the camera keyframes.


Step 4
Creating a Keyframe at the beginning of the timeline by zooming the camera in using the mouse wheel (if this doesn't create a keyframe, double-click on the timeline to create it).


Step 5
Move the timeline forward a few seconds and then, using the mouse wheel to zoom out, create a second keyframe (if this doesn't create a keyframe, again double-click on the timeline to create it).


Step 6
Select both keyframes and then right-click on them to choose Transition Curve. Select Smooth from the list.


3. How to Export the Transparent 2D Background Movie From Cartoon Animator
Step 1
To export your project go to the top menu bar and select Render > Render Video.


Step 2
This will open up the Render Settings window where you can choose how to export your video or image.
Make sure to select the Transparent Video checkbox to keep the transparency. You will also need to select the .MOV option under Format.


Step 3
Also look through the other options here that you would like to edit, such as the output size and output range. Once you are happy with your selection, click on the Export button to choose the location to save your video file. Once it has finished rendering, you will have a video file that you can use to import into your Adobe After Effects project.


4. Import Transparent .MOV Files in Adobe After Effects for Animation
Step 1
Now that we have all our exported video file ready, it is time to take it into Adobe After Effects where we can merge our cartoon background with live action video footage.
In Adobe After Effects, import the character video by going to File > Import > File and selecting the MOV video file you just exported from Cartoon Animator.


Step 2
Importing the file will prompt a new window where you must decide how to interpret the alpha channel. Select Straight - Unmatted and click OK.


Step 3
Once you have imported the cartoon background video you will find it located in the Project Panel, which is usually located on the left side of the screen.


Step 4
Import the live action video files you downloaded from Envato Elements by going to File > Import > File and selecting the video files.
Once imported, you will also find the video files in the Project Panel.


5. How to Compose the Scene in After Effects
Step 1
Create a new composition by going to Composition > New Composition (Control - N).


Step 2
In the composition settings, use the following:
- Composition Name: Render Comp
- Width:1920 px
- Height:1080 px
- Frame Rate: 30 frames per second
For the Duration, this can be changed to suit the length of your cartoon animation and live action video file.


Step 3
Use the mouse to drag and drop each movie file into the composition, making sure that you layer the videos correctly. In order to make the live action character appear in the video it needs to be layered on top of the 2D background. Here is the list of layers in order:
- Fog
- Halloween Curtain
- Man Running
- Wendigo Monster 1
- Wendigo Monster 2
- Wendigo Monster 3
- Background Mov


Step 4
Make any adjustments to the layers by going into the Transform options of each layer to resize and reposition if necessary so that they are all scaled appropriately compared to the rest of the scene in the 2D animated background.


Step 5
Create position keyframes for each live action character so that they follow the movement of the 2D animated background.
This will need a little trial and error to get right, so keep adjusting the animations and use the Play Preview button until it looks correct.


6. Use Adjustment Layers to Blend Animation Components and Scene
Now we'll adjust each element so that the characters look like they belong together in the same scene. We've given things a bit more contrast and cool blue look, but adjust to your tastes.
Step 1
Create an adjustment layer by going to Layer > New > Adjustment Layer, and then make sure that the layer is placed at the very top of all the other layers.


Step 2
In the Effects & Presets panel, search for Photo Filter and add it to the adjustment layer by double-clicking on it (or clicking and dragging it on to the layer).


Step 3
Go to the Effect Controls panel and select the following:
- Filter: Cooling Filter (82)
- Density: 25%


Step 4
In the Effects & Presets panel, search for Levels and add it to the adjustment layer by double-clicking on it (or clicking and dragging it on to the layer).


Step 5
Go to the Effect Controls panel and play about with slider controls on the Histogram to get better contrast.


Step 6
Create a Black Solid by going to Layer > New > Solid.


Step 7
Double click on the Ellipse Tool to create a black ellipse shape.


Step 8
Change the mask mode to Subtract and then adjust the Feather value to blur out the edges. For this example we have used the value 663.


Awesome! You're Finished!
Congratulations! And that's how you can merge live action video with 2D animated backgrounds using Adobe After Effects and Cartoon Animator. Feel free to use multiple characters or your own designs and footage to create your own video combinations.
I hope you've found this tutorial useful and I'll see you next time, here on Envato Tuts+!
More Cartoon Animator and After Effects Animation Tutorials

 AnimationHow to Add Special Effects to Cartoon Animation Using After EffectsJonathan Lam
 AnimationHow to Add Motion Blur Effects to Cartoon Animation Using After EffectsJonathan Lam
 Animation3 Ways to Colour Grade Cartoon Animation Using After EffectsJonathan Lam
 AnimationHow to Add Soft Shadow Effects to Cartoon Animation Using After EffectsJonathan Lam
 AnimationHow to Add Soft Lighting to Cartoon Animation in After EffectsJonathan Lam
 AnimationHow to Make a Talking Avatar With Cartoon Animator and After EffectsJonathan Lam