Tips & Tricks

How to Make a 2.5D Animation in After Effects
Tuts+Photography

So far you have learned how to use After Effects in two dimensions, but in this After Effects animation tutorial, it's time to take it up to 2.5D!


Let's talk about what 2.5D is, and I want to start this 2.5D tutorial in After Effects with a quick example that I created.


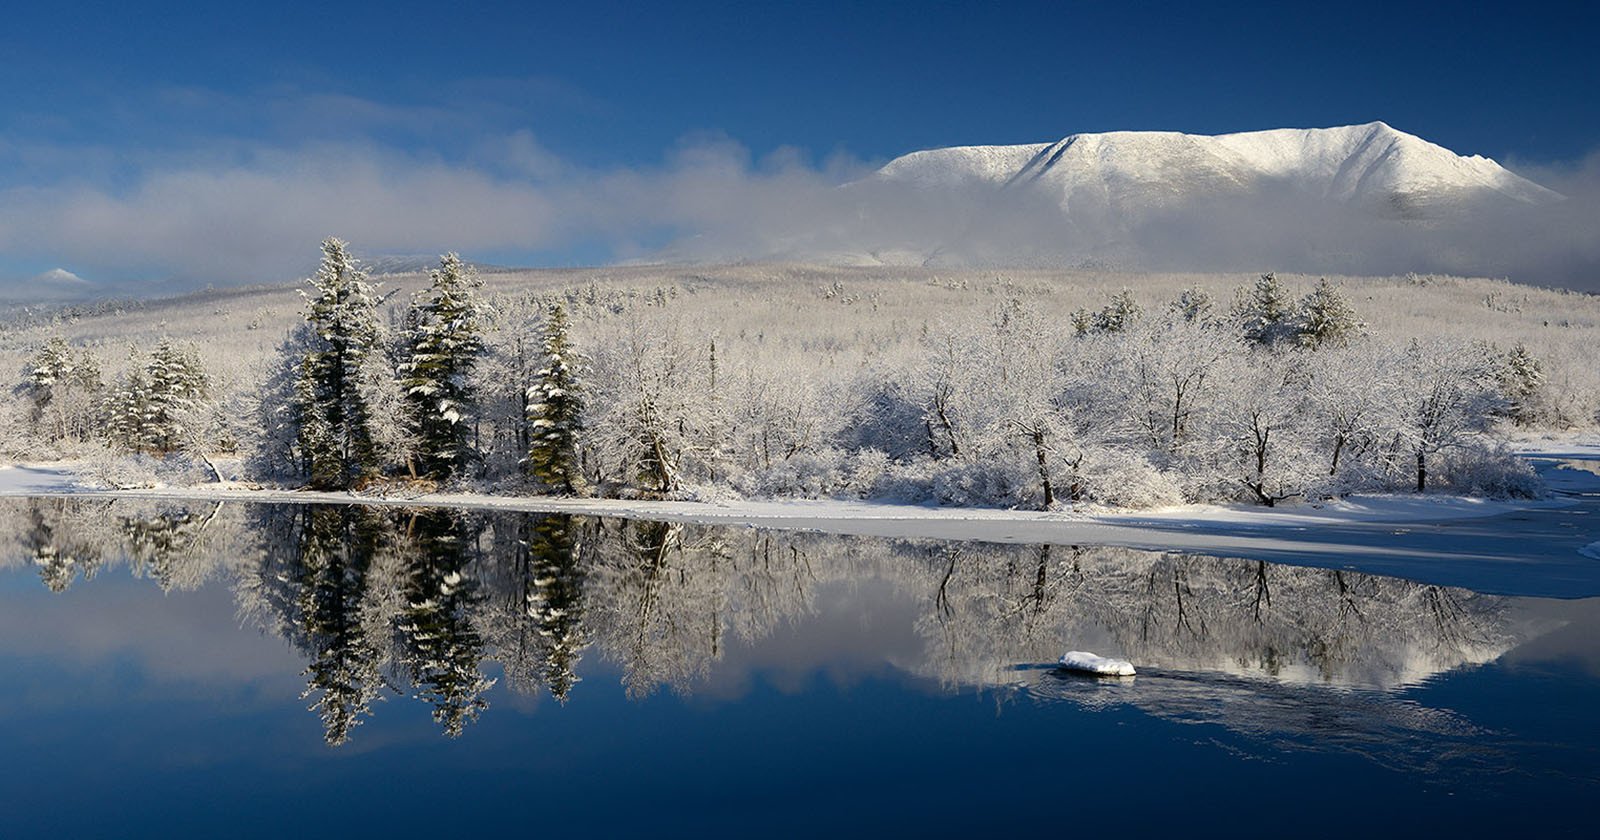
At first glance, you might look at this shot and say that's hyper-lapse, or maybe it's a video shot from a truck and dolly. But it's actually not. Although this has a very 3D look, this is 2.5D. This means that it's creating a 3D environment out of objects that only have two dimensions.
This shot was entirely created from a single base photo, which was then cut out into the foreground layer and the mountain layer, plus the other moving elements.


I also did a bit of clone stamping to fill in some of the gaps, and then I arranged it in such a way that when I moved an After Effects camera, it had some parallax to it which gave a distinctly 3D look.
Now, there are lots of examples of this that you've probably seen throughout your life, and it may have not clicked before. You may have seen something that looked as if the video had frozen and the camera was flying through the environment. That could very well have been a 2.5D shot, which is where you create something that looks very 3D, but all the objects have no third dimension.
So I want to show you how to put together a really simple example. In fact, this is going to look even cooler than that last example, even though I'm only going to use text. So jump on into this basic 2.5D composition.


If you want to follow along, make sure you open up the 2.5D After Effects project. So in this project I have three text layers and a solid background layer that's been locked.


To start, let's take the three text layers and enable the 3D layer switch.


You'll notice that when you select the layer, the anchor point has now changed to a 3D gizmo. It's a little tool that has three handles or arrows that let you position the object or rotate it in three dimensions (you can adjust the X, Y, and Z dimensions).


In fact, if you open up the object options and take a look at the Transform properties, you'll see that a lot of these now have a third dimension that we can adjust.


Next, let's throw in an After Effects camera. You can do this by right-clicking down in a blank area and going to New > Camera.


Select a 35 mm preset and click OK.


Now the objects won't have changed much yet as they are sitting at the zero mark in 3D space. But we can move these around and get a really cool look.
For example, let's take the back text layer and change the value to 4000. You can see in the preview panel that it looks smaller, but that's actually because it just moved away from the camera in this 3D environment.


Repeat the process with the middle layer and change its value to 2000.


Press C on the keyboard to bring up the camera tool. You can continue to press C to scroll through the other camera tools (Orbit Camera Tool, Track XY Camera Tool, and Track Z Camera Tool). By using the camera tool, you can see how the text is composed in 3D space.


We can improve the look even more by adding a light to this scene, which will give us some shading. You can do this by right-clicking a blank area and going to New > Light.


Leave everything at the default values, and make sure Cast Shadow is on.


Things may get dark, but don't worry—we can jump down into the light options. When you're working in a 3D environment, pressing AA on the keyboard will bring up the material options. That's usually the thing that you want to jump into when you're talking about the light options, the camera options, or the material options for the text.


So let's go to the light options and increase the Radius. I'm also going to increase the Falloff until I can start to see the layers in the background. Also, turn down the Intensity to give it a bit more color.


As you can see, this light is doing a great job of making things look as if the further back they are, the less light they get. This is done by setting the Falloff to Smooth.


Now make sure to select your three text layers and then press AA on the keyboard to jump into the materials option. Change Cast Shadows to On to create shadows behind each piece of text. The shadows are being cast from this first layer to the second and third layers, and from the second layer to the third layer.


Jump back to the selection tool, and if you grab your light and move it just a little bit on the X axis or the Y axis, or even the Z axis, you'll see your shadows change. So you can set up multiple After Effects lights and create some really cool looks using this kind of 2.5D method.


You can change the shadow's darkness and diffusion, so you can get more of a hard shadow or a very soft shadow.


Congratulations


Congratulations! And that's how you can make 2.5D Animation in Adobe After Effects. Now that you've learned the basics, check out some of the other tutorials we have on Adobe After Effects below.
I hope you've found this 2.5D tutorial in After Effects useful, and I'll see you next time on Envato Tuts+!

 How to Export Video and Graphics From After Effects
 Jonathan Lam21 Apr 2022
 How to Use Alpha and Luma Mattes in After Effects
Jonathan Lam21 Apr 2022
How to Use Alpha and Luma Mattes in After Effects
Jonathan Lam21 Apr 2022
 How to Use Text in After Effects
Jonathan Lam19 Apr 2022
How to Use Text in After Effects
Jonathan Lam19 Apr 2022
 How to Use Masks in After Effects
Jonathan Lam18 Apr 2022
How to Use Masks in After Effects
Jonathan Lam18 Apr 2022
 How to Prepare Logo Artwork to Animate in After Effects
Jonathan Lam22 Apr 2022
How to Prepare Logo Artwork to Animate in After Effects
Jonathan Lam22 Apr 2022
 How to Animate the Layers of a Logo in After Effects
Jonathan Lam23 Apr 2022
How to Animate the Layers of a Logo in After Effects
Jonathan Lam23 Apr 2022